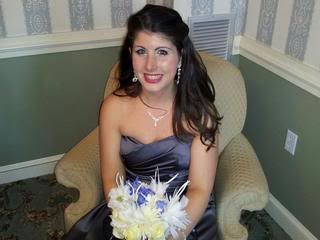
For the face: Before anything I applied a moisturizer with no SPF in it all over my face and then let it sit for a minute before I did anything else.
Then I applied Clean Slate Poreless 12-hr perfecting primer by Tarte all over the face and on the eyelids.
Then I added my favorite Foundation in Redness Solutions by Clinique with a foundation brush.
Then I applied a light concealer underneath my eyes to cover the little dark circles I had that day and to add a little brightness to my skin. I used the $1 concealer by ELF. It works awesome for the price.
Then I added Face powder to my forehead, nose, chin, and under my cheek bones to take away the shine and to set my makeup. I used ELF Mineral Booster in Sheer.
I added a nice pretty pink blush to my cheeks for a pop of color and to prevent my face from looking wash out in pictures. I used one of the blushes from my Coastal Scent Blush Palette.
For the cheek bones I put on a nice matte Vanilla color eye shadow for a nice highlight.
And for a little color I added bronzer underneath my cheek bones, forehead, and to my temples.
If you are going to an event that you know there will be lots of pictures taking, then you really want to apply a little more makeup on then you would any other day, so your face doesn’t look washed out in the pictures. Also make sure you don’t wear products that have more then SPF 15 in it. Because if you wear too much SPF then your face will be glowing in the picture and not in a good kind of way. Believe me, it has happen to me so many times before and I never knew why until I read about it in a makeup artist book. The reason why this happens is because SPF reflects the light away from the face which is a good thing from the sun, but not for your pictures. So no more than SPF 15 people! That is why I used a Moisturizer with no SPF because my foundation already has SPF 15 in it.
For the eyes:
I applied my face powder on my eyelids to prevent any creasing with my handy dandy blending brush.
Then I added an eye shadow base by NYX all over the lids, brow bone, and underneath the eyes.
Most of the eye shadows I used was from my Romantic Eye Collection by Too Faced. :)

I applied Bouquet Toss (matte off white color) all over the lids and up to the brow bone with my blending brush
I then added I DO (gray color) to the outer corner of the eyes with a flat eye shadow brush.
I also added a darker gray onto I Do.
I applied a matte white color from the inner corner into the middle of the eye then added some Soul mates (shimmer white) on top of the matte white.
I also put Soul mates on the tear ducts too.
Then go underneath the eye with the same color.
For a nice highlight I added a matte white color to the brow bones.
To add a little drama to the look I apply black cream eyeliner by Maybelline to the top lash lines.
For my water lines I used my Favorite black eye pencil by Sephora.
To make sure that my eyeliners would stay put for most of the day, I apply a matte black eye shadow on both of my lash and water lines.
For the eyelashes, I applied the Falsie Volume Express waterproof mascara then I added small false eyelashes to the outer corner of the lash line to elongate the eyes.
Then for a pop of color I added a nice pink fuchsia color to the lips by using a Sephora lip liner in fuchsia and then applied a fuchsia lip color by using the Yves Saint Laurent lipstick in 7 Le Fuchsia.
I hope you girls loved this look as much as I did and hope you all have a good day or night.
Ps I saved after every word this time hahah.
No comments:
Post a Comment